When we build a ROM for Android device we can add components on different layers. We can add daemons and libraries on the native layer, system services on the framework layer and system applications we want to build into the ROM (like the phone app, SMS, etc)
In this post, I will cover the process to create a system application with java and native code (c++)
We will start with building and testing our application in Android Studio, then integrate the files into AOSP
Create an Android studio project with C++ support
Add class for native methods:
class Native{
	static{
		System.loadLibrary("simp");
	}
	static native int sub(int a, int b);
	static native int add(int a, int b);
}
Implement the native code and add JNI_OnLoad function:
#include <utils/Log.h>
#include <stdio.h>
#include <cutils/properties.h>

#include "jni.h"


namespace com_example_cpptest {

    static jint myadd(JNIEnv *env, jclass clazz, jint n, jint m) {
        return n+m;
    }
    static jint mysub(JNIEnv *env, jclass clazz, jint n, jint m) {
        return n-m;
    }


    static JNINativeMethod method_table[] = {
            { "add", "(II)I", (void *) myadd },
            { "sub", "(II)I", (void *) mysub }
    };
}

using namespace com_example_cpptest;

jint JNI_OnLoad(JavaVM* vm, void* reserved) {
    JNIEnv* env;
    if (vm->GetEnv(reinterpret_cast<void**>(&env), JNI_VERSION_1_6) != JNI_OK) {
        return JNI_ERR;
    } else {
        jclass clazz = env->FindClass("app/mabel/com/jnitest/Native");
        if (clazz) {
            jint ret = env->RegisterNatives(clazz, method_table, sizeof(method_table) / sizeof(method_table[0]));
            env->DeleteLocalRef(clazz);
            return ret == 0 ? JNI_VERSION_1_6 : JNI_ERR;
        } else {
            return JNI_ERR;
        }
    }
}
Add a simple button and test the native methods
public class MainActivity extends Activity {
    @Override
    protected void onCreate(Bundle savedInstanceState) {
        super.onCreate(savedInstanceState);
        setContentView(R.layout.activity_main);
        Button b=(Button)findViewById(R.id.button1);
        b.setOnClickListener(new View.OnClickListener() {
            @Override
            public void onClick(View v) {
             	Log.d("test","res:" + Native.add(10,20));
             	Log.d("test","res:" + Native.sub(10,20));
	    }
        });
    }
}
Test your app on Android Studio emulator
Integrate The Code with AOSP
Create a directory app in ~/aosp/device/generic/goldfish (here you will store all Android applications built into the rom)
Add a generic Android.mk file to call other makefiles in the subdirectories:
include $(call all-subdir-makefiles)
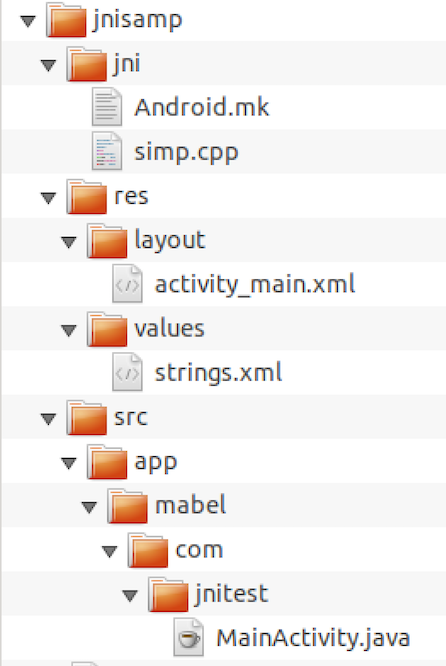
Create the following directory structure in app:

Add the following file to the activity_main.xml (res/layout):
<?xml version="1.0" encoding="utf-8"?>
<LinearLayout xmlns:android="http://schemas.android.com/apk/res/android"
    xmlns:app="http://schemas.android.com/apk/res-auto"
    xmlns:tools="http://schemas.android.com/tools"
    android:layout_width="match_parent"
    android:layout_height="match_parent"
    tools:context="app.mabel.com.myapplication.MainActivity">


    <Button
        android:id="@+id/button1"
        android:layout_width="wrap_content"
        android:layout_height="wrap_content"
        android:text="@string/btn"
        tools:layout_editor_absoluteX="140dp"
        tools:layout_editor_absoluteY="197dp" />

</LinearLayout>
and the string table to res/values/strings.xml:
<resources>
    <string name="app_name">JniTest</string>
    <string name="btn">Test</string>
</resources>
Create Android.mk file in the jni directory :
LOCAL_PATH:= $(call my-dir)
include $(CLEAR_VARS)
LOCAL_MODULE_TAGS := eng

LOCAL_MODULE := libsimp
LOCAL_SRC_FILES:= simp.cpp
LOCAL_SHARED_LIBRARIES := \
	libutils liblog libcutils

LOCAL_C_INCLUDES += \
	$(JNI_H_INCLUDE)

LOCAL_CFLAGS += -O0 -g3

include $(BUILD_SHARED_LIBRARY)
Create Android.mk file in jnisamp directory:
LOCAL_PATH:= $(call my-dir)
include $(CLEAR_VARS)
LOCAL_MODULE_TAGS := eng
LOCAL_SRC_FILES := $(call all-java-files-under,src)
LOCAL_PACKAGE_NAME := JniTest
LOCAL_JNI_SHARED_LIBRARIES := libsimp

LOCAL_PROGUARD_ENABLED := disabled

include $(BUILD_PACKAGE)

include $(call all-makefiles-under,$(LOCAL_PATH))
Add the java and c++ files from your project
Add AndroidManifest.xml file to jnisamp directory:
<manifest xmlns:android="http://schemas.android.com/apk/res/android"
        package="app.mabel.com.jnitest">

    <application
        android:allowBackup="true"
        android:label="@string/app_name"
        android:supportsRtl="true">
        <activity android:name=".MainActivity">
            <intent-filter>
                <action android:name="android.intent.action.MAIN" />
                <category android:name="android.intent.category.LAUNCHER" />
            </intent-filter>
        </activity>
    </application>

</manifest>
build the rom and test your code. if you connect using adb you can see that the process gets a regular uid
Make Your Application Run with System Privileges
Add coreApp and sharedUserId to the manifest file:
<manifest xmlns:android="http://schemas.android.com/apk/res/android"
        package="app.mabel.com.jnitest"
        coreApp="true"
        android:sharedUserId="android.uid.system">
....


</manifest>
Add the following vars to main Android.mk file:
LOCAL_CERTIFICATE := platform
LOCAL_PRIVILEGED_MODULE := true
Build the rom and test your work
Now run the application, connect to the device using adb and run ps -A to see all the processes. You will see application run as system user:
